Tuesday, January 2, 2018

My word for 2018: Intentional

Good morning! It’s been a while since I’ve published anything on this blog. And, a lot of content has been removed. There are a couple reasons for that: 1) some of the items were a little too personal which 2) made me a target of cyber harassment. Great lesson learned, though, and great gift to me by the harasser. I’ve learned to be more intentional with what I do, and what I say. So, my word going into 2018 is intentional.

This year I’ll be intentionally sharing only those things that relate to me: my weight loss journey, overcoming personal struggles, and my quilting/crafting.

If you want to check out my book reviews, please follow me at Lynetteonlifeonbooks.blogspot.com

Happy New Year!

Lynette

Wednesday, November 6, 2013

Christmas Placemats


I'm off work this week, so I've been spending a lot of time in my craft room. I ❤️ my craft room so much! 

Today, I finished these Christmas placemats:


I thought, since I have some time and I think they came out pretty well, that I would share how to make them.

First, I selected 6 different Christmas fabrics. I actually bought the fabric last year, but didn't get around to doing anything with them until this week.

I cut one of the fabrics to 15"x21" (you will need 4-6 of these depending in how many placemats you will be making). Them I cut 6 pieces of batting to 12"x18".

I cut the remaining 5 fabrics into the following dimensions:

Fabric 1- 9.5"x12"
Fabric 2, 3, and 4- 2.75"x12"
Fabric 5- 2.25"x12"
(You will need 4-6 of each of these fabrics).

Here are my cut fabrics:


To assemble the placemats, first you will place the 15"x21" fabric right side down. This will be the backing of your placemats. I did this on top of my cutting mat so it was easier to see where to place the batting.

Next you will center the batting on top of the backing fabric:


For the top of the placemat, you will place Fabric 1 on top of the batting right side up, lining up the left edge. I did pin the fabric on the left side. Then you will place one strip of Fabric 2 right side down on top of Fabric 1:


Take the whole placemat "sandwich" to the sewing machine and sew the pieces together on the right side. Use a walking foot if you have it. Then iron the fabric pieces open.

At this point, I quilted Fabric 1 using straight lines approximately 2.5 inches apart. Since I scrapbook, too, I just grabbed a scrap of card stock I had in my pile and used it as a guide. You could leave this part unquilted if you want, or you could quilt the lines closer together. 

After Fabric 1 was quilted, I added Fabric 3 to Fabric 2 the same way I added Fabric 2 to Fabric 1. I continued until Fabric 5 was sewn on. 

At this point, I realized my quilt math was a little off so I flipped the placemat upside down, pulled the backing fabric out of the way and trimmed the fabric to the edge of the batting:


So now the placemat is ready for the binding. I used the "cheater" binding method. A tutorial can be found at: http://www.made-by-rae.com/2010/10/rae-pretends-she-can-quilt-and-shares-a-quick-quilting-tutorial/.


After pinning all the sides of the binding, I simply sewed around the edges. Easy Peasy! 

I love how these placemats turned out, and can't wait to see how they look on my dining room table! 

Saturday, November 2, 2013

Superman Quilt

I made this quilt for my son, Zachary. 

I love this quilt sooo much. It is the 1st twin size quilt I have made. It took awhile but it came out so good!

Here is the quilt I used as my pattern:

http://creativechicksatplay.blogspot.com/2010/02/orange-mango-tango-quilt.html?m=


I have been wanting to make Zachary a quilt  for awhile, and after finding Superman fabric at the quilt shop he finally agreed. Here is the fabric that I used:


Four patterns of Superman fabric plus a maroon batik, yellow cotton and a star pattern I found at Joann's (my favorite store).

This is a disappearing 9 patch with a black border to separate some of the blocks. It was so easy! I really enjoyed making this quilt, and I hope Zachary enjoys using it for years to come.

(The quilt hanging up in my craft room!)  The borders look brown here, but they're really black.

Next quilt-a denim recycle quilt for my hubby. The ideas are endless!

Wednesday, July 10, 2013

Flip Flop Wreath

Since the 4th of July is over, it was time to take down the 4th of July wreath and put up a new summertime wreath. As I was scrolling through Pinterest, I found a cute flip flop wreath, so I decided to try my hand at it. I am kind of embarrassed to share how easy it was! But I will!

Materials:

4-6 pairs of flip flops (I bought mine on sale at Michaels, but you can find them anywhere)
1 wreath form (I used a wooden form I found in the floral department of Michaels, but you could use any wreath form, or you could make your own out of any sturdy material)
Embellishments of your choice
Paint (Optional-I used it to paint the wooden wreath form I used)
Scrapbook paper (Optional-I used it to glue on the front of the wreath form, but you could also just paint it, use washi tape, decorative duct tape, etc)
Hot glue (I used about 5 sticks of hot glue, so have plenty on hand)

Instructions:

Prepare your wreath form. I had some glittery scrapbook paper left from another project, so I cut it and glued it to the front of my wreath form. I also painted the sides and back using some left over turquoise paint.

Once the wreath form is ready, and before you get out the glue gun, place your flip flops and embellishments where you want them on the wreath form. This is very important because if you glue them first, it is next to impossible to move anything.

Once you have your flip flops and embellishments how you want them, get out your glue gun! But be careful-that glue is hot! (I only burned myself twice on this project, but I am still surprised every time by how hot that glue gets!)

Glue everything in place. Once the glue is dry, you are ready to hang. I used a small piece of ribbon that I tied between flip flops. Simple!

Here is the wreath hanging on my door!


So cute and so easy! Happy Summer everyone! And Happy Crafting!

Monday, July 8, 2013

Glass Mosaic Stepping Stone

Like most everyone else, we have one of those big, ugly trash cans that goes on the side of the house.  And in the course of the past 9+ years, the patch of grass under where it is placed has died, leaving behind a plot of dirt.  It kills me to see this big, ugly spot, so I decided it was time to cover it up.  Since the dirt is pretty packed from having the trash can on top of it for so long, I decided that it wouldn’t do to replant  the grass; it would just die again.  


So I decided to make a stepping stone to place on top of the dirt.  I liked the idea of making the stone because it would provide another opportunity to involve my youngest son, Zachary. I really enjoy working on projects with him!


We went to the home improvement store and bought the biggest cement stone we could find.  The one we chose was 18”x18”.  Because we would be using glass tiles on the stone to make the mosaic, we also went to the flooring aisle to pick up some grout.  We bought the 1 lb tub of sanded grout guessing that this would be plenty of grout for our little project.


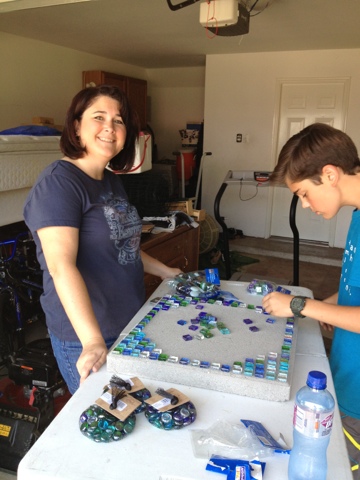
Our next stop was the craft store so we could purchase the glass tiles, as well as the glue (E6000) we would be using. We decided on the bags of green and blue mixed glass gems in squares, large round stones, as well as small round stones.  Since we didn’t really know how many of each it would take, we bought 5 bags of the square and large round stones, and 3 bags of the smaller stones (Way, way, too many! It only took 3 bags of square and large round stones, and 1 of the smaller stones, so we returned the rest.) Here is Zachary with all of our supplies ready to get to work!


Once we got home, it was time to get started.  The first stepwas to decide on a design.  Zachary wanted to put a big “Z” in the middle of the stone, and decorate around it, but I convinced him that we needed a different design, but he could place a small “Z” in one of the corners if he still needed to.  We decided to frame the stone with the smaller square tiles, then a circle with the large round stones, then fill in with the small round stones.  What we found as we filled in the stone was that the design came to us fairly easily, and we enjoyed working on the design.  We had a lot of fun:


After we placed all the stones and were happy with the design, we glued all the stones down.  To do this, we lifted each stone, put some glue on the bottom, and put them back where we had lifted them, so that the design was kept intact. Here it is-all glued!


Then we waited.  The glue had to set overnight before we could grout, but the stone was G-O-R-G-E-O-U-S!  And it really only took about an hour and a half to design and glue.


The next day, the grouting began.  I pulled out the sanded grout, and after adding water and mixing, we got a 1 lb tub of grout that was maybe half full.  Yep, it became fairly obvious that we did not have nearly enough grout.  After applying what we had to the stone, it didn’t even cover ½ of the stone:


Off to the home improvement store I went for more grout (another 2 lbs, making it a total of 3 lbs of grout) 


After the final 2 lbs of grout were mixed, the entire stone was grouted:


The grout directions said to wait 20 minutes, then wipe the stones with a cheesecloth.  I didn’t have a cheesecloth, so I used a plain dish towel.  But I quickly found that I needed to wait a lot longer than 20 minutes.  It was actually more like 3 hours before I felt safe wiping off the stones without messing up the grout.  I wiped them more than one time throughout the day to get most of the grout off the stones.  The stone was finished!  But it had to sit for another 24 hours before it could be placed in its final resting spot.


Finally, the next day, after the grass was cut, my fabulous husband placed the stone in the dirt plot, and hosed it down.  It is sooo beautiful!  


It does seem like a shame to use it to place the trash can on but that’s what it was made for.  


I will confess something, though, I may make a few more to place in other places around the yard.  I just loved making this beautiful stepping stone!  I hope you love it, too!